
By the way, how do you determine the placement of your elastic (or non-elastic) waistband? Or, do you sew the waistband where the pattern tells you to, and they fit perfectly? In that case, I’m really happy for you.
This is how I do it. I didn’t invent this method, but read about it in writings by that deep well of sewing knowledge, Sandra Betzina of Power Sewing. I have learned to never install a waistband on pants without this technique. So, thanks Sandra. I’ve created a visual here with my limited graphic skills. I hope it explains it well.

- Cut the pants with some extra inches vertically; those extra inches should be above the waist seam, not at the pant hem (snarky eye roll here).
- Prepare a piece of elastic that fits around the waist comfortably, pinning to form a loop. Wear the elastic, then try on the pants, tucking them under the elastic to where the pants feel best.
- Adjust the pant waistline by pulling up or down, and seeing where the rest of the pants are falling comfortably and are pleasing to the eye, remembering that vertical seams should fall straight.
- Mark a line with tailor’s chalk at the lower elastic edge. Remove the pants, lay them out flat and add seam allowance above the chalked line.
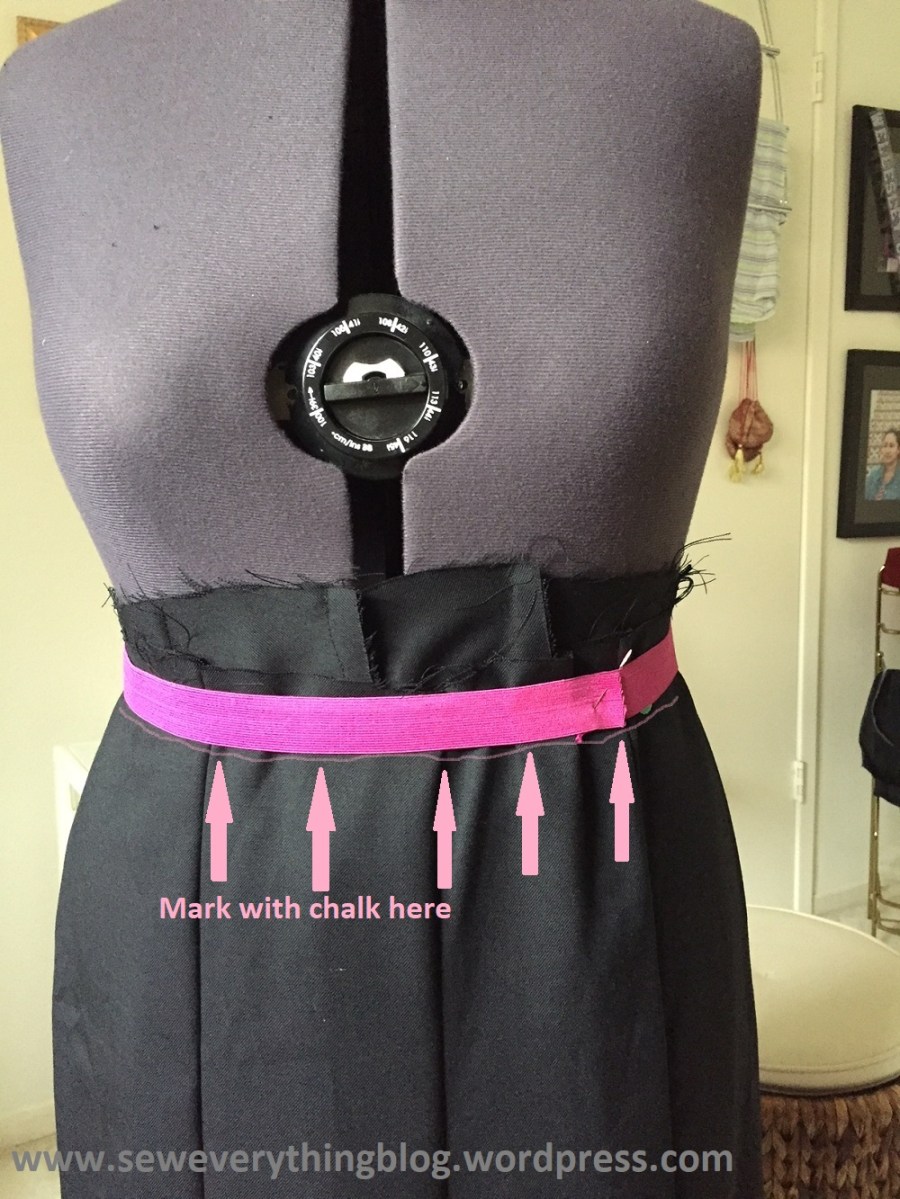
- Cut away the extra fabric above the seam allowance. The separate waistband will be added to this new waistline.
- For those of us with a “mature” waistline, the chalked line will look funny when the pants are laid out flat, although I’m never amused. But stay with it; once you wear the finished piece, you’ll have a comfy just-right waistband, and a good looking pair of pants.
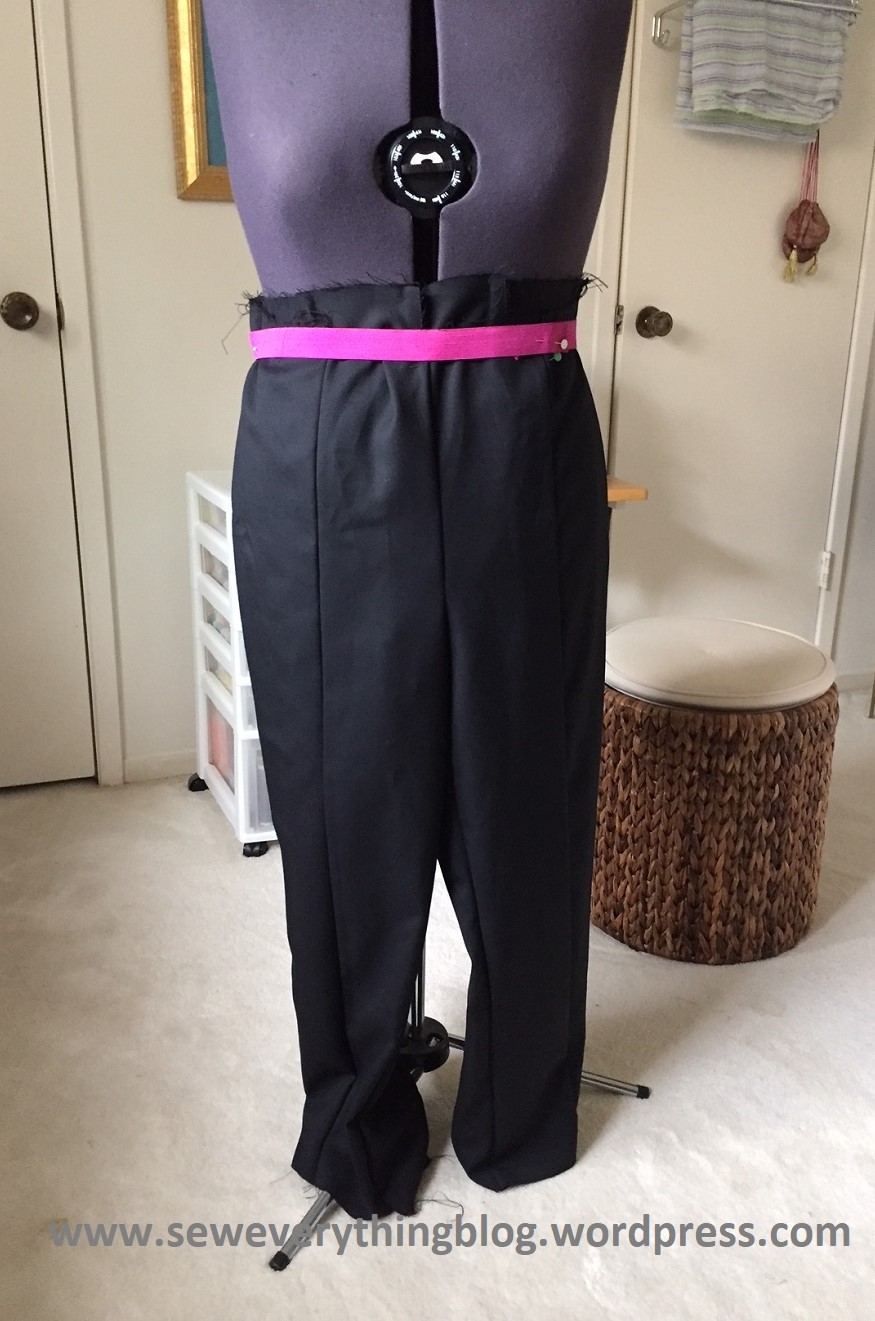
This is how I’ve been installing the (separate) waistband on my pants whether they’re knit pants, woven pants, elastic waist or a fitted non-elastic waist. The black wool gabardine pants in the photos have front seams – more opportunities to perfect the fit. I will write a review in a later post – but it’s a slow project. FYI, I resurrected this pair of pants from the wadder pile to give them another chance. I think I can make it work. Stay tuned….
Now, go sew up a storm (apologies to victims of Hurricane Michael for that remark. I sincerely wish you the best; I know what it’s like, having gone through Hurricane Harvey last year. We were spared but others in this area were not so lucky.)
Samina

I took a pants fitting class at SewExpo awhile back, and the instructor uses this technique as well. And someone called her on it, having seen it in Power Sewing, and Instructor I Forget Her Name said “I didn’t invent the wheel on the car I drove here in, either!”
That Betzina is full of fine thinking. I watched a DVD on pockets by her, and it was honestly cram packed full of really useful things I’ve not seen other places.
My concern with the extreme unevenness at the top is that I don’t know that you’re that uneven. And given my poor mirror placement in my house, I’d be hard pressed to see if the legs weren’t pulled up unevenly. I think I’m in the market for some 1″ square gingham for a new pants pattern.
LikeLike
That unevenness, I believe, is due to the pants being pinned to the front of the dress form – pant-front and pant-back together. If I was wearing them, my behind would fill in the back. (I sound clear as mud, don’t I) .
LikeLike
This is a great fitting tip. I remember hearing about it on a different Sandra Betzina Craftsy course, perhaps pants fitting? It’s so nice that we can all share information.
LikeLike
Very Useful Tip!
Thank you so much for posting it and for the great illustrations, too…
🙂
LikeLike